Photography: Have you ever wondered how people get those beautiful finishes on their photos of their products? In this article I will share my experience with you on using two cheap alternatives that you can use in the comfort of your own home.
Me and photography go a long way back, however product photography was never on the table. Simply because I was more interested in taking photos of nature or traveling. However, since I am a Graphic Design intern at Go Eco Love, I have been tasked to create something new and get to know this field of photography better by putting into use my existing skills.
Due to the pandemic and other circumstances I was not able to go to a photo studio to ensure a quality shoot, and that’s when I realised that creating my own light box will help solve this problem and also help me in the long run. Taking photos using the box seriously elevated the level and the look of the products that I shot to use on Amazon.
I first learned how to make a light box from Youtube – DaWanda English, but you can also find useful tips here: blog.martinbelan.com. The box is inexpensive to make. It’s simply a cardboard box, white paperboard and some tissue paper.


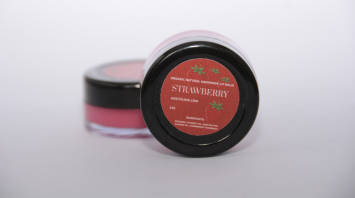
By taking photos inside a box that diffuses natural light from all sides, you can remove shadows. You can also give a white, magazine-like look to your photos, like this (this photo was created in the DIY box):
I was also searching for comparison videos, blogs or articles where photographers would compare the cheaper DIY box to a more professional and, yes, more expensive product.
Honestly, I could not find one, so I decided to take this opportunity to show you: is it really worth the money to buy a box from Amazon, or can you create the same quality photos for your products at home?
I had the opportunity to borrow a photobox purchased on Amazon from the founder of Go Eco Love, therefore I was able to use both boxes at home to compare the differences between them.


By looking at the photos, I think both boxes do the job quite well with a minimal difference. Taking pictures with different camera settings, or even using flash had a bigger impact on the quality than the box itself. Hence why I would recommend the DIY version 100%!
Pros against the Amazon one is that you can fold it, so therefore it is easier to store this box at home, especially in a small apartment like mine! It also has an additional LED lighting as an extra, however using flash with the DIY can compensate for this easily.
Cons on the other hand is of course its price and if you definitely want to use the LED, you have to use a cable to connect it to your computer. If you don’t have too much space like me, it could be problematic.

Pros for the DIY box are: you can carry it around the house or flat without a cable; it is also cheaper, and you can always create a new one if it gets damaged – and recycle the damaged one!
Cons: it does not have an additional light (unless you attach one yourself, but that is an additional cost to consider), and it is harder to store in a small flat.
The conclusion for me was this: there are all sorts of uses of the lightbox in photography, so consider building a light box if you want professional-looking results on a budget. Remember that the most important thing is the end product and not the tools you used to get it right!